 Adjusting a Helios 44M-6 lens focus for Nikon
Adjusting a Helios 44M-6 lens focus for Nikon
Adjusting a Helios 44M-6 lens focus for Nikon
WARNING: in spite of extensive adjustments, my lens still cannot focus to infinity; it is short-sighted to about 6m. I describe the process since there are many versions of the 44M, and the tutorial may be 100% successful for some version.
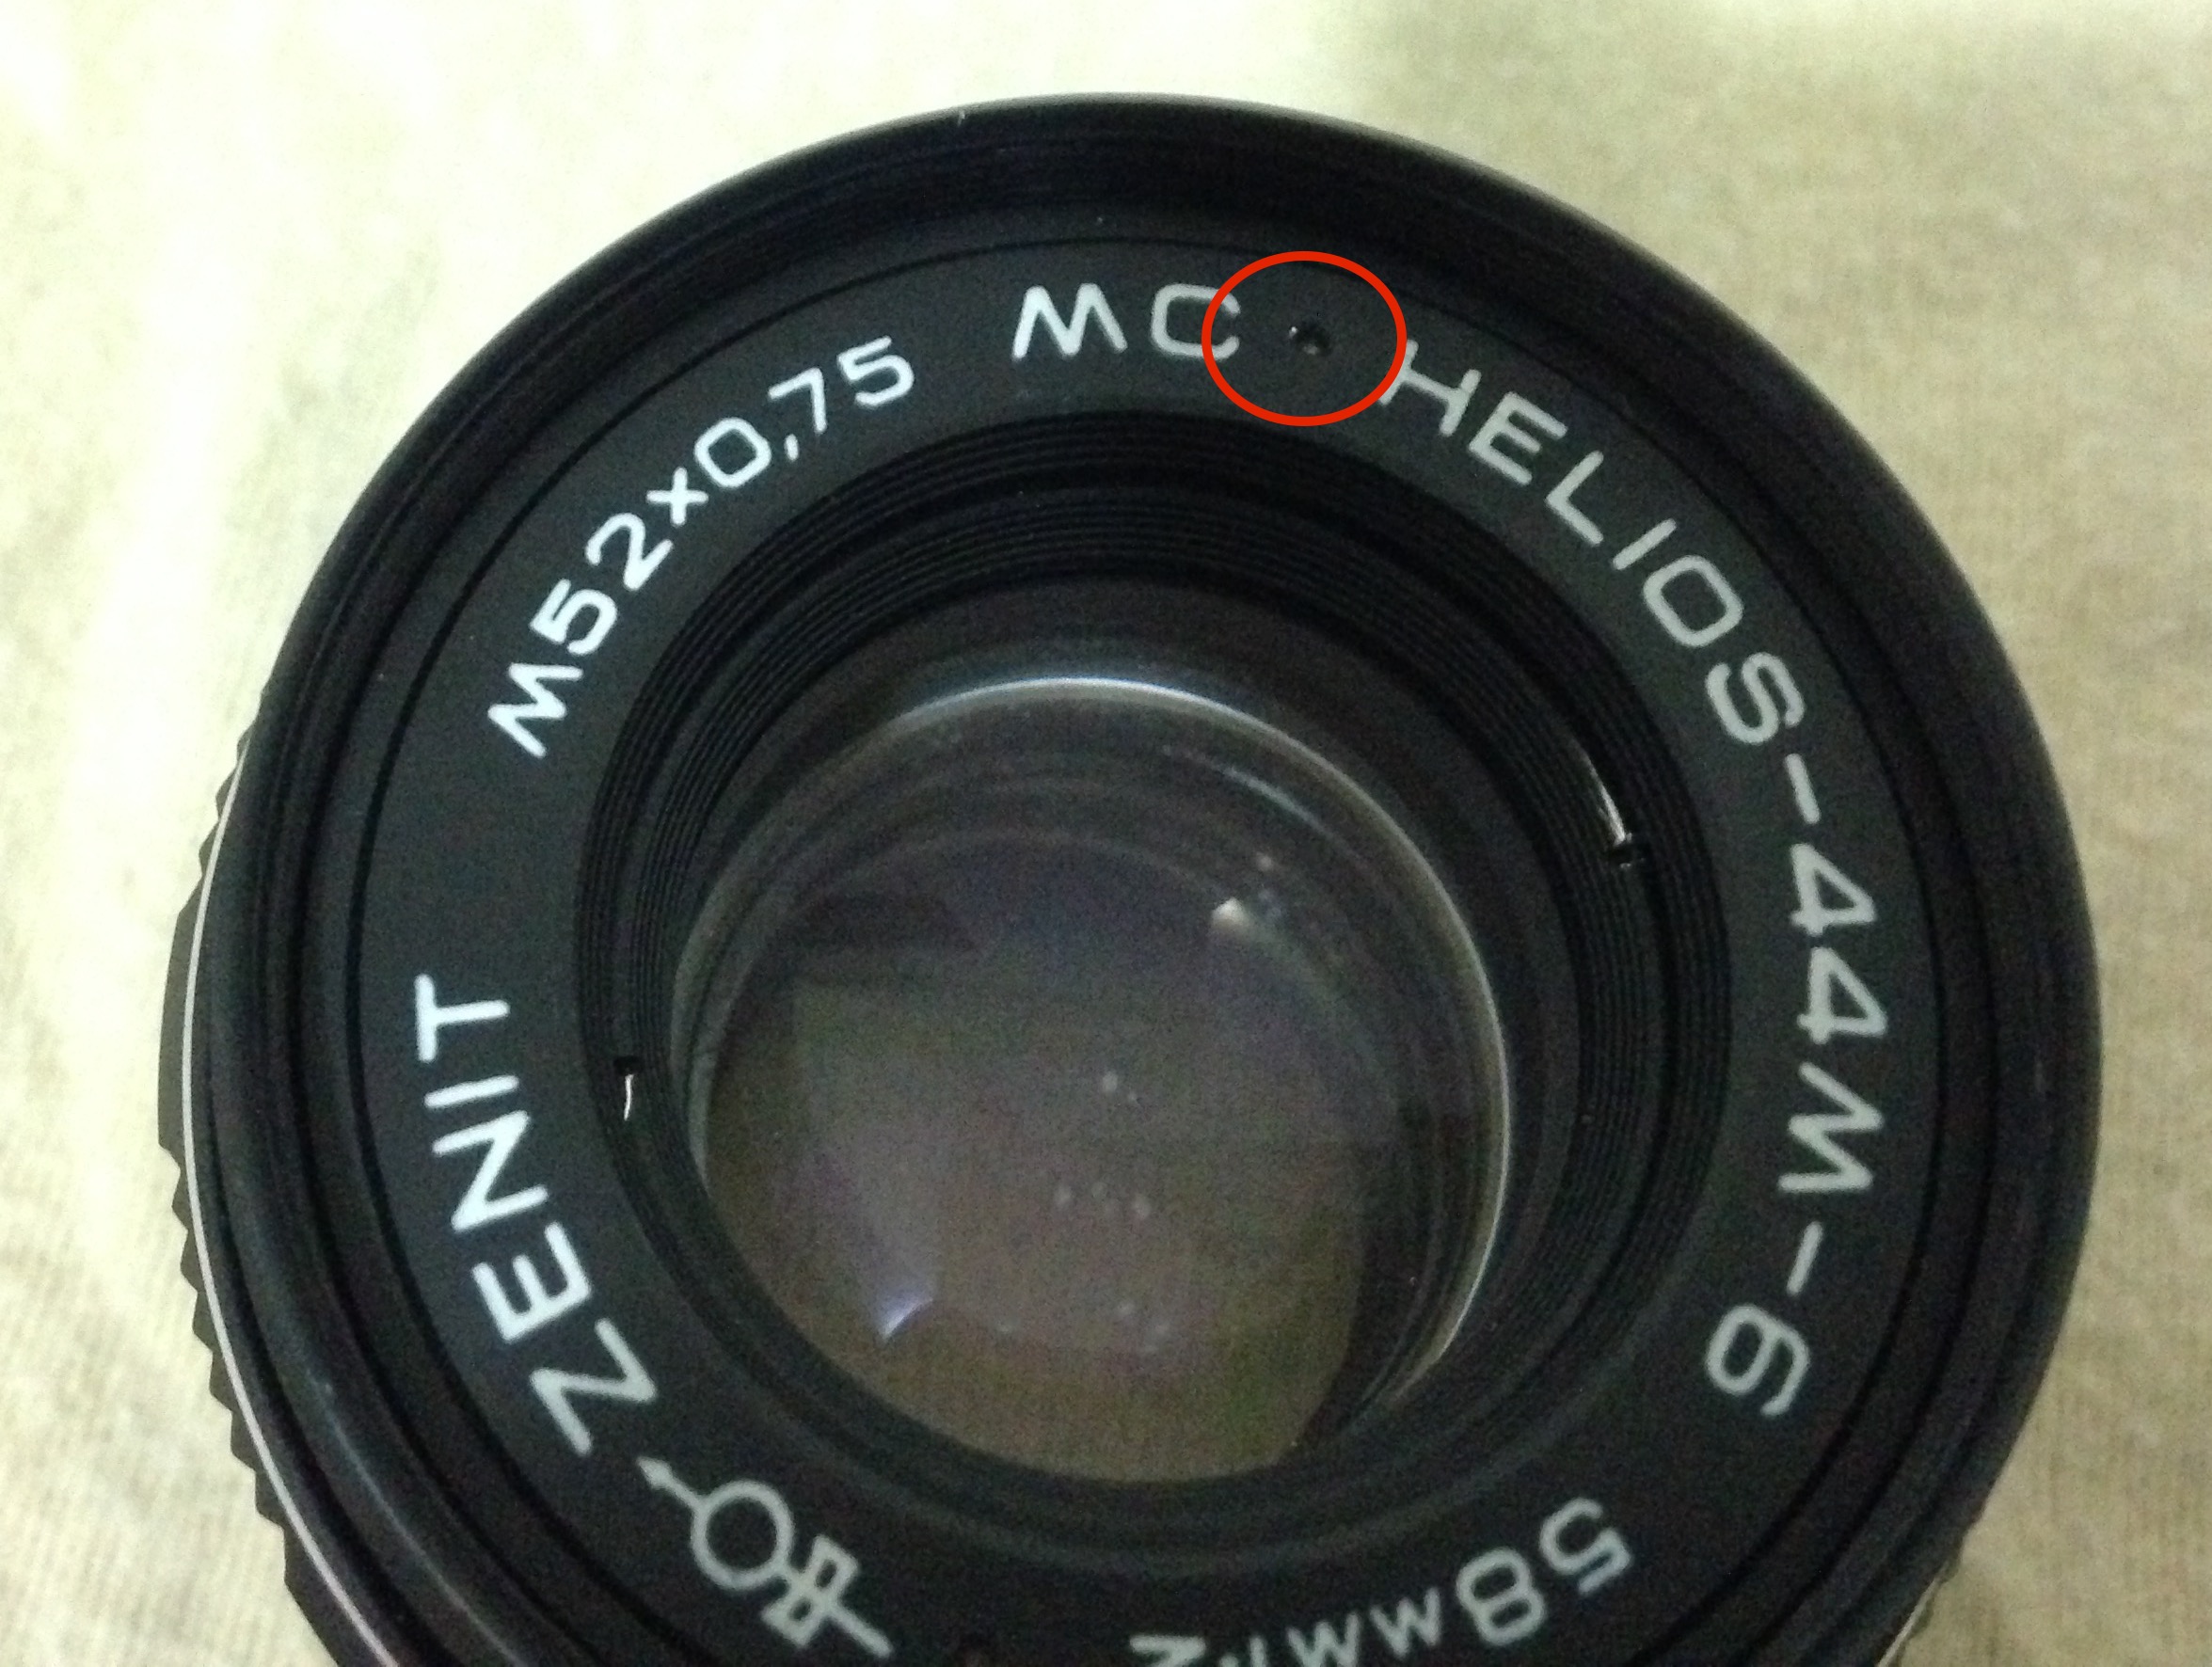
The Helios 44M is a normal fast lens manufactured in the Soviet Union. Seven versions of this lens have been produced; mine is the sixth version (44M-6). It is famous by its rough, all-metal construction and the "swirly" bokeh.
Most of these lenses were made for the M42 screw mount. There are M42 adapters for most other SLR mounts, but Nikon F adapter brings a problem: the lens cannot focus to infinity, since Nikon F distance from flange to sensor/film is larger than M42 standard. There are adapters with a correction lens but they degrade the image, or at least they disturb the bokeh.
But are ways to make the Helios 44M to focus to longer distances in Nikon. It is a matter of allowing the core of the lens move further back, into the mirror chamber. A single milimeter is enough. Some people shorten the outer barrel body, other people remove the rear part, etc.

Since I don't have metal working tools, I followed a hint in the Internet that suggested that lens core could be "screwed" further into the lens.
Of course, this changes the relationship between the distance scale painted in focus ring and the real focus distance, but this is not a problem if you can focus using some camera feature, like Nikon's rangefinder and/or the in-focus yellow point.
I think that the focus ring can be loosen from the helicoid and recalibrated, but I only paid attention to the relevant bolts when I was already remounting the lens.
Dismantling the lens is very easy. You need some tools like fine screwdrivers, tweezers, etc. For the smallest screws, I used the small screwdriver found inside the corkscrew of a Swiss Army knife.
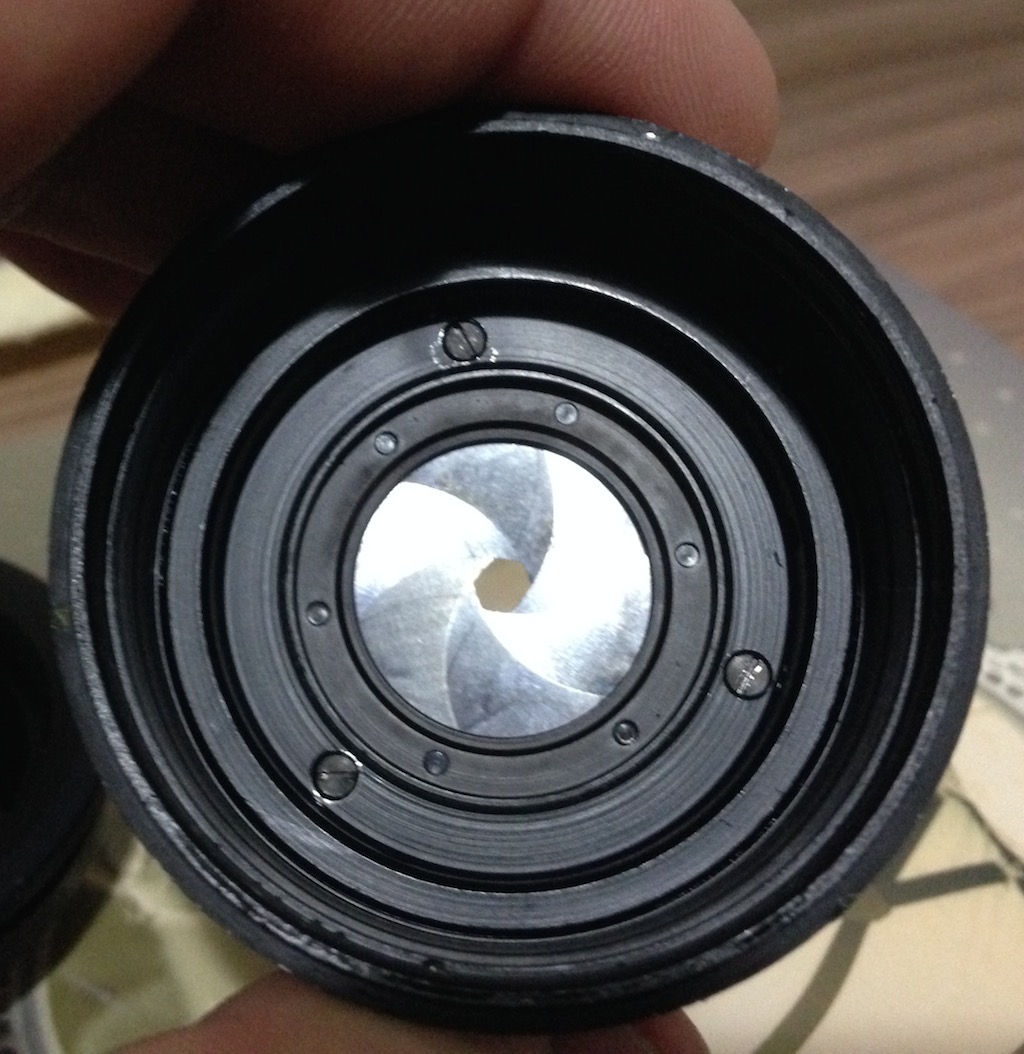
First thing is to open the lens front, unscrewing the front ring (Figure 1) and removing the filter holder ring (kept in place by 3 screws).
I think it is better to remove all glass elements before further dismantling, to reduce the risk of some tool scratching or breaking glass.
Figure 2, right circle shows the ring that holds front glass elements in the core. Unscrew it (you may need to bang gently to loosen it) and then remove the two front glass elements plus a spacer.
Pay attention to the orientation of all glasses, so you can remount them later. If you forget to take note of this, just look for Zeiss Biotar in the Internet; you will see that the most convex side of each glass is orientated outwards (most convex side of front elements to the front, most convex side of back elements to the back).
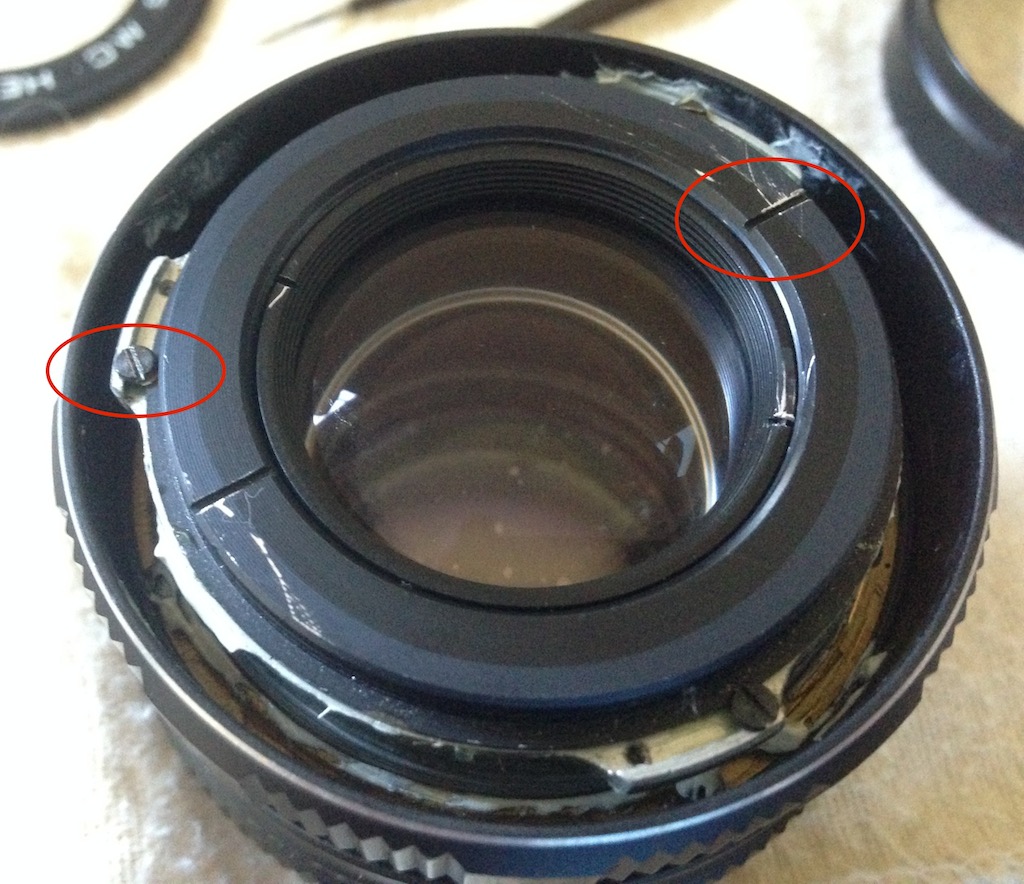
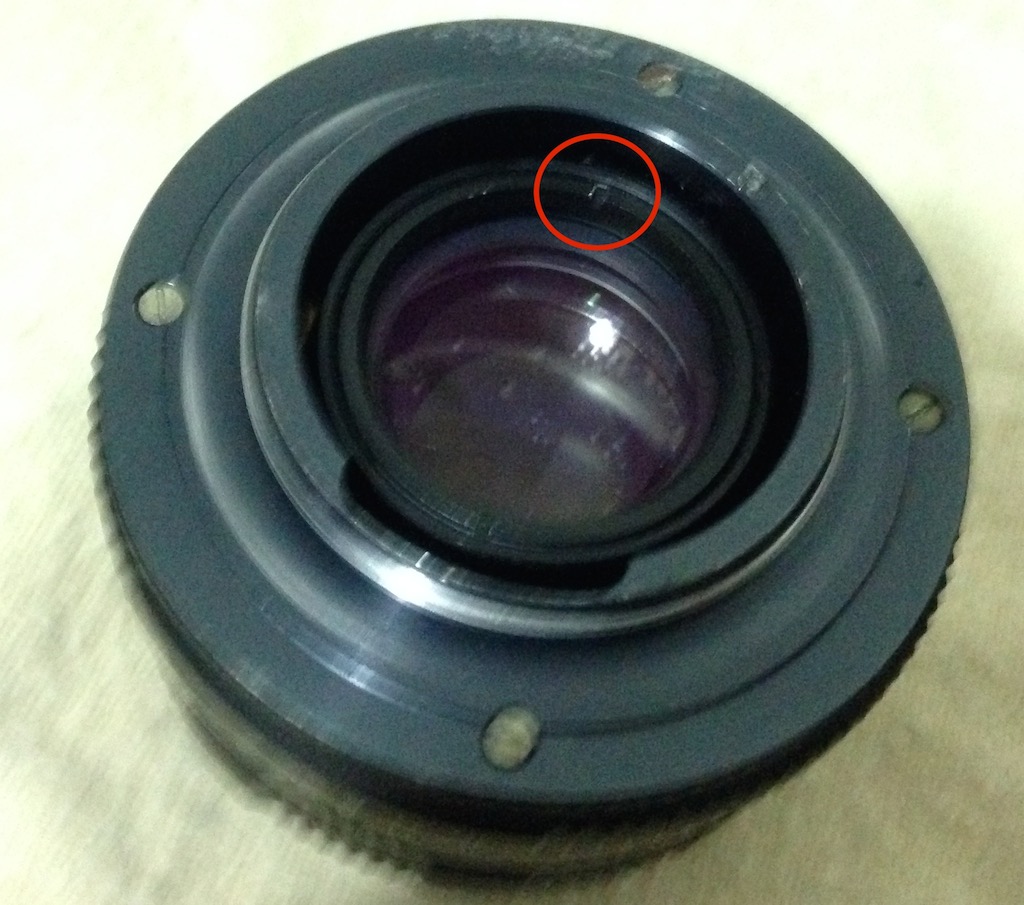
Figure 2 also shows the screws that keep the lens core attached to the inner barrel. Unscrew these ones, but first remove the glass elements from the back of the lens (Figure 3).
This lens have four glass pieces (4 groups and 6 elements; the thicker pieces are doublets cemented together).
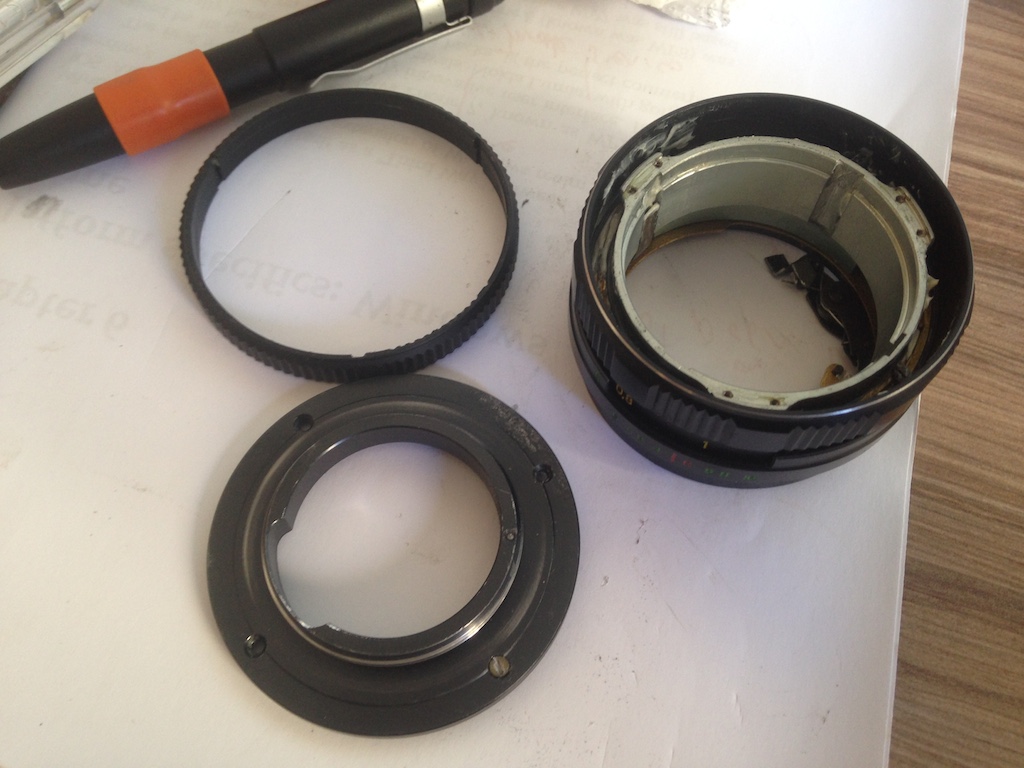
At this point, the lens core contains only the diaphragm, so it is easily separated from the barrel. You should have a collection of pieces like shown in Figure 4.
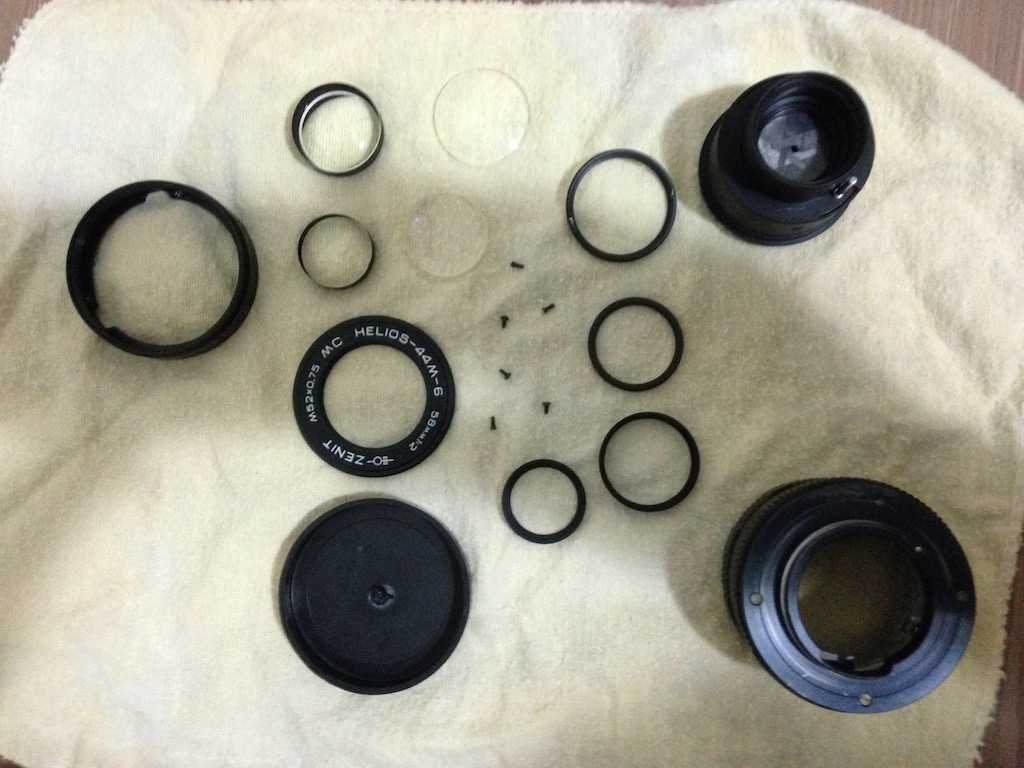
If you just wanted to clean the lens, you can stop here. My lens has had some fungus in the past, but it had been put in silica gel, so it was better now. The glass elements were clean and with very little damage from fungus.
A small issue that could not be fixed was some stain between the elements in the back doublet group. I guess the fungus fed on the cement.
The core can be further dismantled. The front part can be unscrewed easily, as shown in Figure 5.

If necessary, you can now dismantle the diaphragm mechanism. I could unscrew the three bolts (Figure 6) but I could not unscrew the ring, due to lack of a proper tool. There is no good angle to "bang" it and any error could destroy the diaphragm.
I wanted to dismantle the diaphragm since it was the only piece that still had some smell of fungus, so I just washed the piece with ethanol. Not sure if it was a good idea, because I had to re-lubricate the diaphragm and now the blades have that dreaded oiled aspect. But the smell surely went away :)
Now, the actual modification in focus. In Figure 7, you can see the lens barrel components. The focus ring (black) drives the helicoid (golden brass ring). The helicoid drives the inner barrel (silver) up and down.
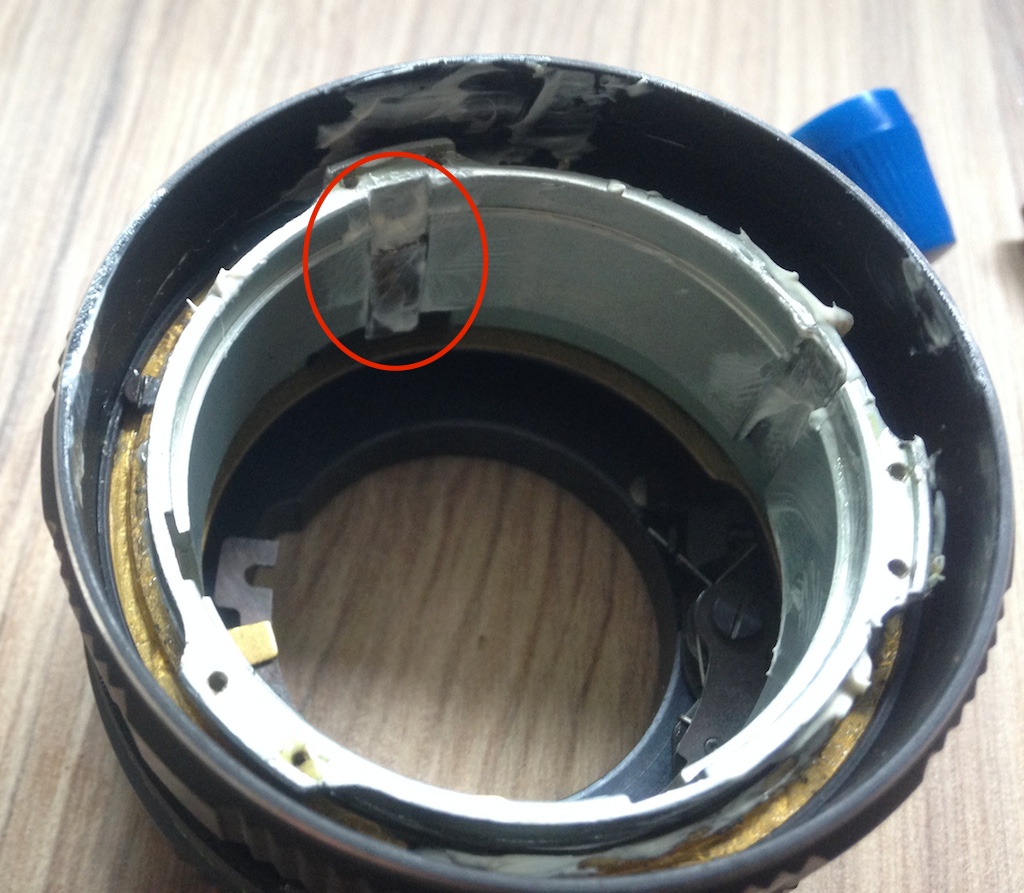
The inner core (silver) is held in place only by the helicoid, and is prevented to rotate by two holders, one of them circled red at Figure 7. The holder lets the inner barrel go back and forth, thus adjusting the focus.
By the way, the holder in Figure 7 is greased because I took the picture after the focus adjustment.
The helicoid has some leeway beyond infinite. That is, the inner barrel can be moved further back, without any physical modification. This is the basis of our adjustment.
You need to:
1) Rotate the focus ring to almost infinite. More specifically, to some position around 2.5-4m. If in doubt, go to infinite and readjust at step 4.
2) Insert a screwdriver between the inner barrel groove and the golden holder circled in Figure 7. Bend the holder a bit inwards. There are two holders; bend both, just enough to allow the inner barrel to rotate.
BE VERY CAREFUL at step 2, since the holders may break instead of bend! I have broken one of them. Fortunately, the other was enough to keep the mechanism in working order. I put some grease to reduce the stress on the remaining one.
Since the inner barrel is free at this point, you could seize the opportunity and screw it off completely, clean the helicoids, put new grease, etc.
3) Rotate the inner barrel so it goes further into the outer barrel (don't remember if it needs to be turned clockwise or counterclockwise).
The idea is to rotate a full quarter turn beyond the original calibration. As can be seen in Figure 7, the inner barrel has four grooves, so it aligns again with the holders every 90 degrees.
4) If it is not possible to turn a full quarter turn and the grooves are not yet aligned with the holders, rotate the focus ring to a slightly nearer distance and try again, until grooves and holders are aligned.
5) Bend back the holders into the inner barrel grooves. Check that focus mechanism is still working (inner barrel going back and forth when focus ring is rotated). It may be a good idea to put grease in the grooves.
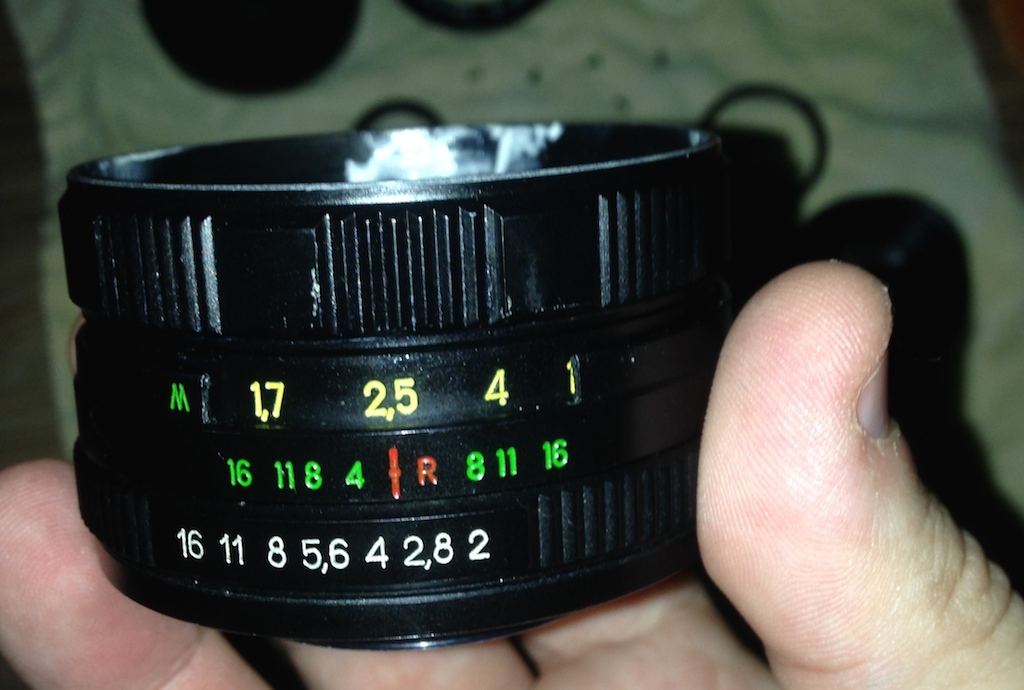
Due to the focus ring adjustment in steps 1 and 4, it will now hard stop before infinite. Figure 8 shows the hard limit in my lens. Don't worry about the numbers; the quarter-turn adjustment invalidated the markings.
While I was remounting the lens, I saw that the outer helicoid is held by three screws, so the focus ring can possibly be be recalibrated, if you care.
Perhaps the "new infinite" hard stop is still too near-sighted. After reading this thread I opened the back of the lens (Figure 9) and filed the aperture stop-down lever (Figure 10) a bit.
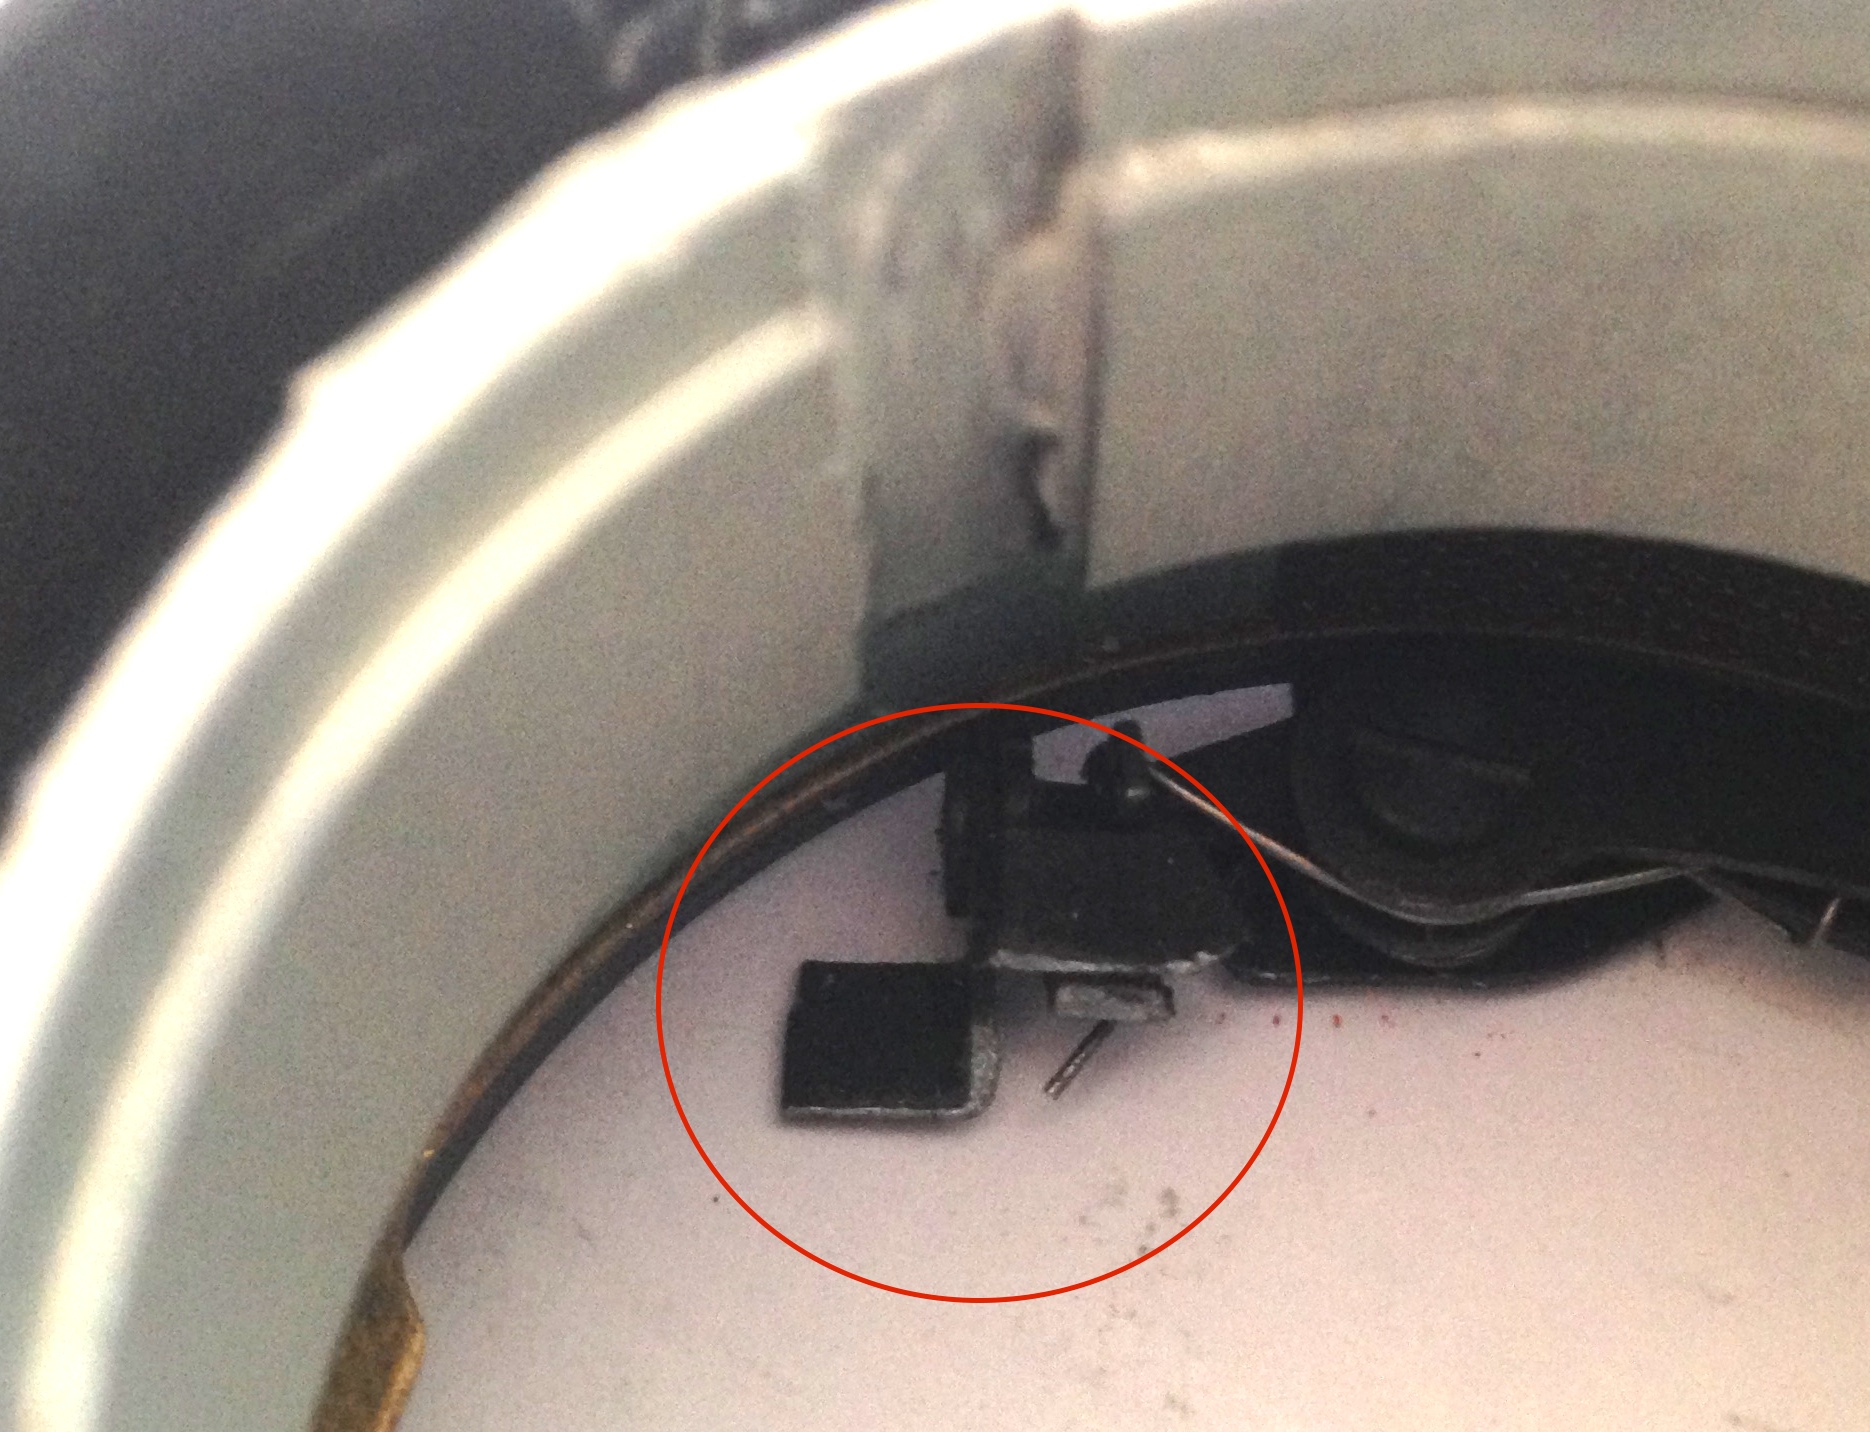
The edge of this lever in Figure 10 is the first thing that the lens bumps when trying to go to infinite after the helicoid quarter-turn adjustment. Filing this part, or removing it entirely, allows the lens go further back. After filing the edge, my lens could go until 4m in the scale.
If, after filing, the lens still does not focus at infinity on the Nikon camera, one could try to remove this lever entirely, and locking the spring lever at maximum tension position to keep a working aperture ring. The coupling between ring and aperture is not a "hard" coupling; it is a spring, and the aperture stays at f/2 if the spring is not tensioned.
I found that the core of the lens bumped in that part because I had locked the stop-down pin in pressed-down position with some glue. I was lucky to do that in first place, otherwise I would discover the problem only when the adapter arrived (adapters keep the pin pressed down all the time).
I bought an infinite focus M42-Nikon adapter along with the "normal" adapter, because it was cheap and I would have a spare, just in case.
This adapter includes a negative glass element that allows an unmodified M42 lens to focus to infinite in Nikon. Being a single glass that was not calculated specially for the adapted lens, it will cause some optical degradation, the exact nature depending on the lens.
In the case of my modified Helios, it shows strong haziness (like if vaseline was smeared on the front of the lens) when aperture is f/2 and scene has strong lighting. I guess this is caused by internal reflections, even though the adapter glass is even coated. Stopping down the aperture reduces the problem until it disappears.
So, if you plan to use some old M42 lens with the adapter, be prepared to use tigher apertures to get acceptable images. Some lenses like old fisheyes already impose a small maximum aperture, so the problem might not show at all.
The adapter was useful to check that my Helios was properly working after my interventions. I took off the additional glass to check lens sharpness, that is really good.
Unfortunately, I could not test the lens focusing on infinity without the additional glass, because the adapter is too thick (the glassless adapter is very thin), and adapter's rear blocks the lens movement, so I couldn't turn it until the 4m point. Both factors are important; the lens focuses at 1m at 1.7m dial position, even though it has already been recalibrated, so the adapter's thickness makes the lens very short-sighed indeed.
I happen to have the old Zenit that came with the Helios lens. In the Zenit viewfinder, I can see that the lens calibration was changed: 1.3m focus at 3m, as expected, and focus dial can go beyond infinite by a small margin.
I got another adapter that has no glass, but has a "focus confirmation chip" that indeed seems to help in manual focusing — the focus LED still works without that, but it is more jumpy. This adapter is very thin, as it should be.
But I found that the lens was still too short-sighted, 2m maximum focus distance.
I went for radical surgery to try to fix that: removed the whole aperture mechanism (levers, springs) so the lens core could move back until it bumps in the outer barrel; and removed a screw that holds the helicoid, since that was preventing the focus ring to go until infinity.
These changes meant that the aperture ring would not be functional anymore. Too bad — this lens is interesting because of the bokeh at maximum aperture.
After these radical changes, the lens could focus at 8 meters, maximum. Bummer... but at least it can function as a "portrait" lens, since 8m is enough for an upper-body portrait in my APS-C camera.

After these pictures, I saw that the adapter was a bit distant from the lens body, even after fully screwing the lens into the adapter, and tightening the most I could. The distance was almost 1mm, more than the necessary to make this lens finally to focus on infinity!
The reason is that the rear outer case, a piece right behind the aperture ring, has a lot of material before the mount screw — almost 1mm, exactly the amount that does not let the barrel to screw completely into the adapter.
So, I removed this rear part (it can be separated just by removing some screws, the lens itself does not need to be dismantled), and began to file and sand it. Sanding was slower but it assured an even removal of material, since you just need to work on a table covered with a sheet of sandpaper.
I didn't even have to remove the metal up to the mount screw; something around 1/3 or 1/4 of the excess was enough to get the lens screwing into the adapter deep enough to achieve infinity focus!
I had a problem that ended up destroying this lens ;(
I had removed a very small screw from the Nikon-M44 adapter, thinking that it would be limiting the M44 mount screw. I did that in the endeavor of getting infinity focus. I was thinking about doing some modification in the adapter, too. In the end, it was not the culprit, I had to sand and file the rear case of the lens.
Well, that tiny screw in the adapter with no apparent function is actually very important: it prevents rotation past the 'mounted' position, when the adapter is unmounted. With the screw in place, you can only rotate the adapter to the 'right' direction, that releases it from the camera.
Without the screw in place, of course I rotated the adapter to the wrong direction while trying to dismount the Helios, and it was stuck! It didn't go forward, something with a spring-like action was limiting it; and it would not go back, either.
I suspected that the spring-like thing that was preventing the rotation was the aperture lever, so I decided not to force the adapter in that direction. That was my luck, since it was indeed the aperture lever tangled with the electronic chip of the adapter.
Since I had tightened the adapter firmly to the lens, and the unscrew direction would put more force into the aperture lever, I had to dismantle the lens, accidentally destroying it in the process, until I could reach the adapter's electronic chip and break it from the adapter (it was simply glued to it). Then the adapter was free to rotate back to the dismount position!
Finally I was fearful that the aperture lever had been broken or bent due to this accident. Bending it is not an uncommon occurence, at least there are many reports of this happening in the Internet.
But the DSLR was ok. The lens' aperture blades seem to move a bit when a wide-open picture is taken and ideally they shouldn't. It might be the case that lever was bent down a bit, perhaps 1/4 stop or less, since the extraneous movement is about 1/4 or 1/3 of the movement between f/1.8 and f/2.0. I took hundreds of photos the days after the accident and none show signs of miscalibration.
So, be very careful when using adapters in your Nikon camera! And don't remove seemingly unnecessary screws!